Everything cross stitch! an introduction
 Introduction to Cross Stitching
Everything Cross stitch has to offer lets you put that extra ounce of love into tangible object for yourself or as a special gift.
It can be a social hobby or done in peaceful solitude. It’s relaxing, easy to learn, builds hand-eye coordination, and helps reduce stress. The repetitive movements become lodged in muscle memories which promotes mental and physical connections.
Elaborate or simplistic projects offer the same repetitive task of stitching which is calming and helps to lower anxiety and fend off depression. It keeps you focused on your hands as you decompress after a stressful day. The best way to learn how to cross stitch is to get a full understanding of the process, get the right materials or starter kit, and remember to have patience as you learn this wonderful new skill while trying to enjoy yourself. Quite simply cross stitching is an easy craft to master providing you with endless pleasure.
*
What is cross stitching?
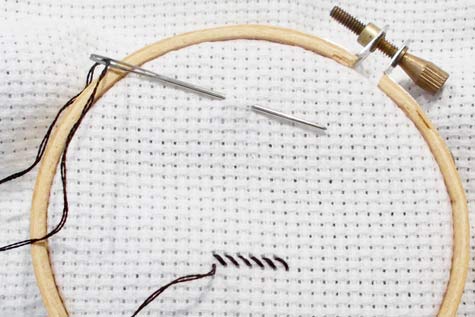
Cross stitching is a form of embroidery that involves stitching an “X” using colored thread (referred to as floss) into a piece of evenweave cloth which results in an image. A few hundred X’s later and a picture begins to take shape.
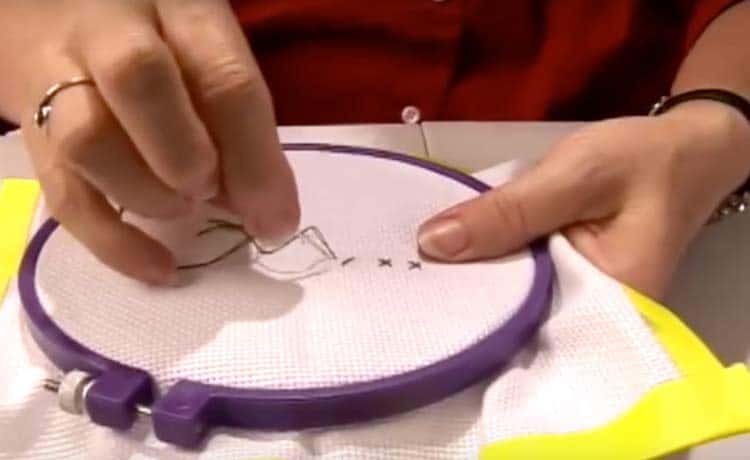
If you can count to 10, then you can cross stitch. Simple, huh? It’s one of the easiest forms of embroidery. The pattern indicates exactly where each stitch will go, what kind of stitch is required, and what color to use for each stitch.
No guesswork required. Count the number of boxes in a row and place the appropriate stitch, then move on to counting the next row, and so on. Even young children can master the standard full stitch and back stitching quite quickly. It’s that easy. In fact it makes a great starter craft for kids to enjoy and use as a platform for more intricate and complex craft skills such as crochet.
Stitches are made in lines. Count the number of “X’s” in a row, stitch a diagonal line from the beginning of the row to the end, then work your way back to the beginning of the row as you cross the first set of diagonal lines, forming an “X” in each box.
The following video presented by Vickie Pavone for Expert Village demonstrates the above steps in cross stitching.
Types of Stitches
- A full stitch is when the “X” fills the entire box. Master the full stitch, and the others are even easier.
- A half stitch is when half the box is filled – the “X” is not crossed. It’s just a diagonal line.
- A quarter stitch is only the bottom leg of the “X”, or half of a diagonal stitch.
- A three-quarter stitch looks like a lower case “y”, a full diagonal line with an additional “leg”.
- Backstitching consists of one strand of floss that encompasses only one part of the box and is for outlining. Imagine drawing a solid line around an image. Backstitching can outline a finished project or be used for stitching letters and numbers. Beginners typically use full stitches and back stitches since they are the most commonly used. Back stitching (also known as ‘stem stitch’) was used to create the Bayeaux Tapestry.
- Long stitches are a more advanced stitch that can be used in lieu of full stitches or as filler, but most beginner and intermediate patterns don’t use them.
- French knots and lazy daisies are more advanced but add a special touch to all those rows of “X’s”. French knots are where the yarn or thread is knotted around itself.
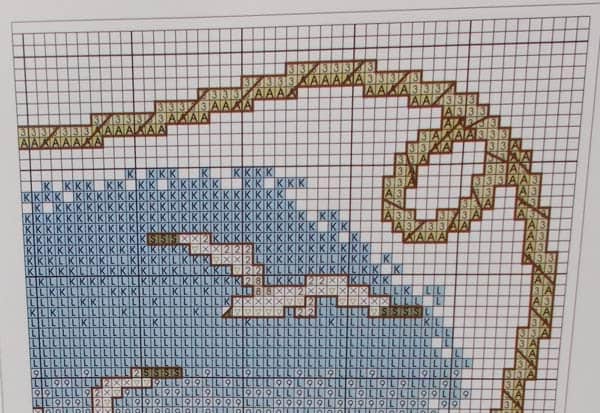
Understanding the Pattern
The pattern is set up like a grid with boxes. Each box contains a symbol that coordinates with a particular color of floss and signifies one stitch (or “X”). Some patterns are color coded with each box being filled with a color rather than a symbol. Sometimes they’ll have a symbol in a colored box.
I prefer the color coded patterns because it’s more indicative of what the finished project will look like. It helps to give you a visual of what you’re stitching. If you’re working on a tree trunk, for instance, the boxes would be colored brown as would the designated floss. So if you’re stitching with pink thread, you’re on the wrong track.
*
Equipment Needed
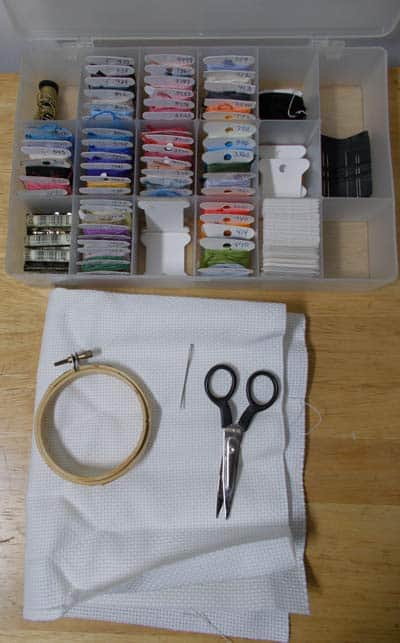
Every cross stitching design requires the same basic supplies: a cross stitch needle, Aida cloth, floss, a hoop, and a pattern. Supplies are sold separately or in kits (See here for 5 highly rated cross stitch design kits). When first starting out, purchasing the kit can be more economical since it contains everything you need for that particular pattern. As you advance, you’ll want to begin buying supplies individually.
Cross stitch stands are particularly useful. They are similar to the old-fashioned TV trays. With an adjustable standing height, the angled arm holds the cloth between scroll bars using adjustable tension. This leaves you free to use both hands. Floor and lap models are available, they have right- and left-handed modality, and are extremely versatile to accommodate tiny projects or extremely large ones.
Aida cloth (also dubbed Java canvas or cross stitch linen) is an evenweave fabric that has evenly spaced holes that form tiny boxes. A box has four corners – perfect for making an “X”. It’s made from cotton and has a bit of stiffness to it, making it easier to hold as you stitch. It comes in different sizes that go by count – that is, how many squares fit in one inch. So, 14-count Aida cloth would have 14 boxes per linear inch. The higher the number, the larger the boxes which means bigger stitches. The most common is 12-count Aida cloth. The boxes are large enough to stitch easily while being small enough to produce a smoothly finished design.
Cross stitch hoops hold the Aida cloth tightly in place while displacing tension evenly throughout for consistently tight stitches. Hoops come in wood or plastic and a variety of sizes. They only cost a few dollars each so it’s easy to add them to your inventory.
Skeins of floss are probably the most important supply. A skein is about eight feet long, and loosely looped together by color. The floss is composed of six strands of thread twisted together to make one strand of floss. A standard pattern usually calls for two strands of floss to be used at the same time. Thread the needle with the two strands of floss just as you would for any regular sewing.
The most common is DMC floss,a U.S.-based company that makes high-quality cotton floss, specialty floss, and everything cross stitch related. They don’t tangle easily, they thread nicely, have a large selection of colors, vibrant colors that are fade resistant, and they are widely available. Anchor floss is a European company that has professional-grade floss with a wide selection as well, and the prices are comparable.
*
Cross Stitching Starter Kits
The best way to begin cross stitching is to start small with a kit. They are made for beginners and have everything needed to start and complete a project. They include the pattern, a piece of Aida cloth, a needle, and skeins of the exact colors the pattern requires.

The pattern will have a legend that matches the symbol to the colored floss. Cross stitching kits have just enough floss to complete its coordinating pattern. The cloth is pre-cut to just slightly larger than what you need. So don’t be wasteful. They sometimes come with a frame that doubles as the hoop.
 Completed cross stitch kits are relatively easy to find. They supply all the tools you need, minus the cross stitch hoop.
If your kit comes with a frame, sometimes it can also double as a hoop. Though some may be small, the kits can produce quite charming results.
My very first project was a Baby’s First Christmas complete cross stitch kit. It contained a needle, floss, patter, and a hoop that I used to frame it when I was finished.
It took about two hours and 15 finger jabs, but I did it. Twenty three years later, it still gets hung on the tree. A fairly simple design that was easy to make and gives a lifetime of pleasure and memories every time I see it at Christmas.
 Buying Your Own Supplies
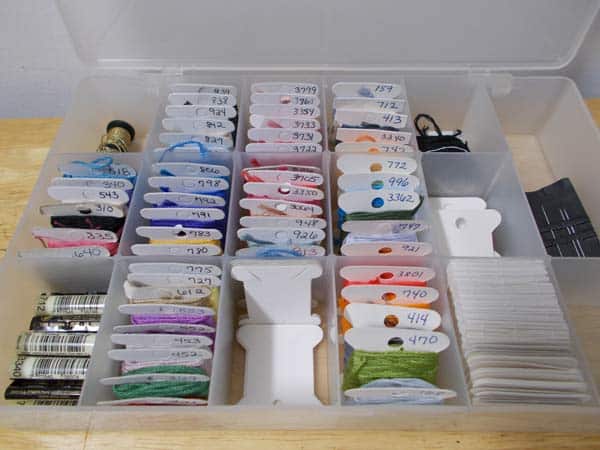
Purchased separately, supplies are usually of a noticeably higher quality. You can begin to grow your inventory to include scissors, a magnifying glass if you plan on doing smaller patterns, a tote bag, floss organizer box, and cardboard floss holders.
My most treasured item in my inventory is my organizer box.
It keeps all of my floss arranged numerically and my needles safe in one secure place and was extremely inexpensive.
*
Find Your Center
Cross stitching starts from the middle of the pattern and works outward. The pattern will be marked in the center as the starting point. If, by chance, it’s not, fold the pattern in quarters. Unfold it, and find the middle point where the squares intersect. The box in the middle of the quarters is your center.
The instructions will tell you the measurements of the finished project. If you have your own Aida cloth, cut it about three or four inches larger. Fold it in quarters, just like the pattern. Unfold it, and find the center box. This box is the same center box as in the pattern. Consider that “Square 1” and start counting using this box as your starting point.
The cloth may fray at the edges, so I tape it front and back with some masking tape to protect it.
*
Getting Ready
Cross stitch needles are slightly larger than sewing needles since they hold more than one strand of thread and don’t need to be as sharp but still be careful.
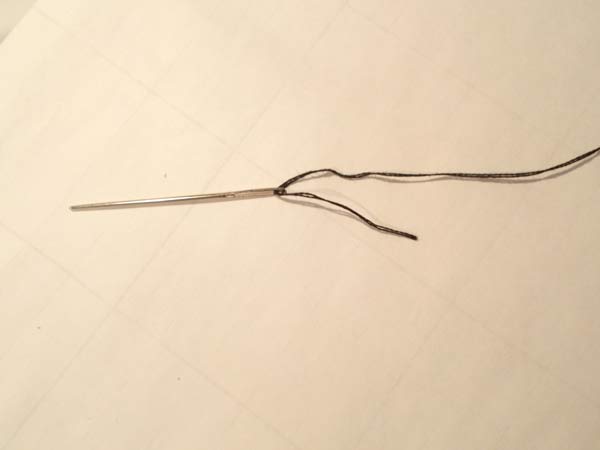
Remove the packaging from the skein of floss and unravel it. Lay it flat, and cut about a 10-inch long length of it. Separate the floss by gently and slowly pulling two strands away from the rest – keep the two strands together.
Thread the needle with these two strands simultaneously as if they were one single piece. Do NOT pull the floss all the way through, and do NOT knot the end. Pull the floss through and stop just after it passes through the eye. That’s it – now you’re ready to start.
*
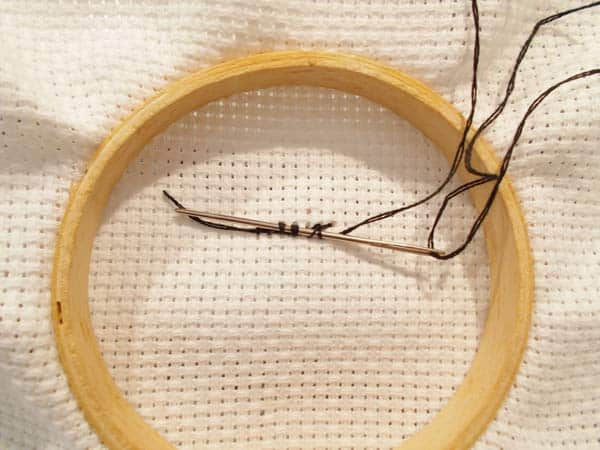
Starting Out
I prefer to work from left to right. I make one row. When I reach the end of that line, I cross my way back to where I first began that row.
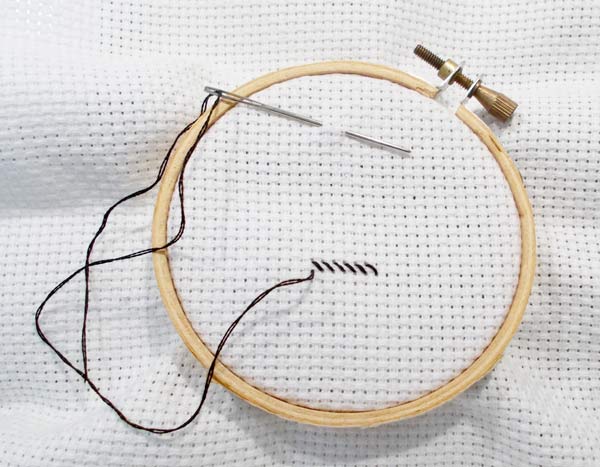
Then I cross that row on the way back.

Hold the floss behind the row with your finger as you cross over it on the way back. This secures the floss so no knots are needed.
The floss doesn’t get as easily tangled that way since I’m right-handed. Moving on to the next color? Change the floss, and begin on the next set of rows with the section you just completed as your base.
In a nutshell, you’ll count how many “X’s” are in a row, sew diagonal lines right to left, then cross them on the way back to where you started. You just did your first line of counted cross stitch!
*
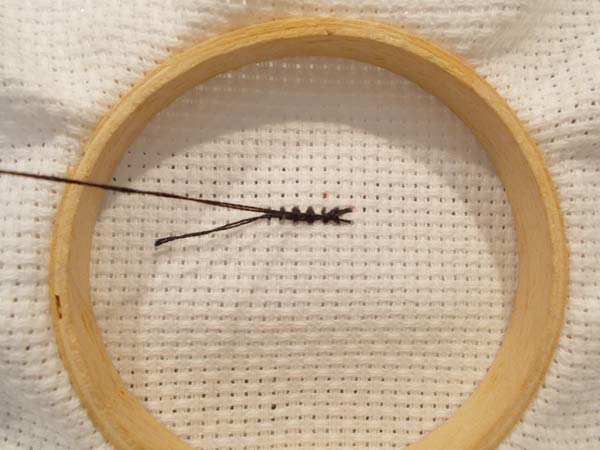
Finishing Up
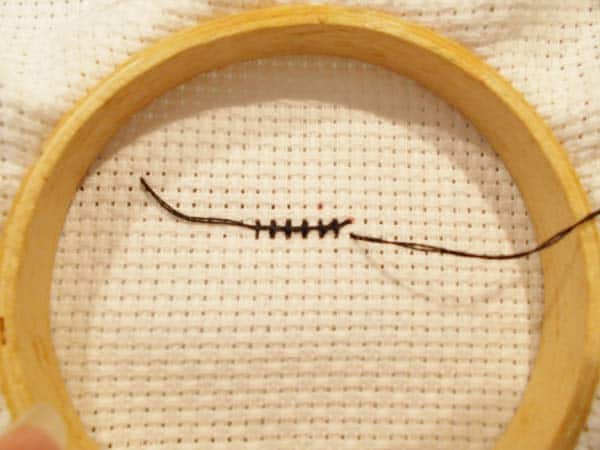
Ending a row is similar to beginning one. Leave a short length of thread after stitching the last box, then gently run the needle under the stitches on the BACK of the cloth. I usually run it under about five stitches or so to make it secure.
Gently pull it through and under the stitches. Trim off the excess floss. This keeps the back smooth and knot-less for easy framing.
With the excess cloth around the edges, remove the masking tape, fold them over a thin piece of cardboard (usually included in the kits) and use a hot glue gun to secure it. If there is no frame/hoop included, I glue a length of lace around the edges as a border. Glue a hanger or piece of yarn on the back to hang it.
Potential Project Ideas
Finding a great gift for important occasions isn’t always easy. So why not do something unique? Create a gift that no one else can give. Cross stitching can be personalized with names and dates, such as in an anniversary cross stitch design.
They can be bought in a complete cross stitch kit, and certain ones will give instructions on how to personalize it. This also applies to a cross stitch birth announcement and a family tree cross stitch. Learn the basic full stitch and back stitch, and you can make the perfect gift with a bit of extra love that they will never forget.
Religious cross stitch patterns are easy to find. Crosses can be quick and easy, or extremely detailed and embellished. Bible verses are simplistic yet elegant since creating basic words consists of mainly back stitching.
Cross stitch calendars are fun to do and won’t take much time. Lots of back stitching is used to create numbers and month names. They can all be embellished with beads, buttons, metallic thread can be used for back stitching to add some glitz, and more. Some complete cross stitch kits include these little variations to add that pizzazz and make it that much more fun.
See our review on five great cross stitching kits here…
*
Kit Alternatives
If you don’t want to buy a standard kit, cross stitch books and booklets are the next step. These are my favorite. Booklets are like stiff posters. The grids are large so it’s easy to count the boxes. They fold out nicely (about the size of a magazine centerfold) and fit neatly into my tote bag. I work off of one section at a time, then just flip it over. No hassle with trying to keep a book open to a particular page.
On the other hand, cross stitch books are nice because they contain large numbers of patterns in one price tag. But they typically come with a theme, like Christmas, the seasons, lighthouses, animals, etc. The grid usually fits on one page and can be either symbols or color coded. The nice thing about cross stitch books is that the patterns usually share most of the same colors of floss with a few variations per pattern. Quite economical.
Everything Cross Stitch – What’s Next?
My next project is going to be a family tree cross stitch. These patterns aren’t too difficult to find, and the colors are nicely limited to trunk and leaves with some metallic threads thrown in for a little pizzazz. At the end of each branch where a relative will be, I’ll cut a little hole and add a bit of hot glue on the backside to prevent fraying. Then I’ll insert a photo of that person and protect it with piece of plastic. Underneath, I’ll back stitch their name, birth and death dates, and relation to me.
No computer printout or store bought gift will be as endearing as a family tree cross stitched by hand and made with love.
Cross stitching is one of those versatile hobbies that can relax you while stimulating your mind and keeping your hands busy. Learn the basic couple stitches, and you’ll be able to build your stitching skills in short order.
Learn to stitch a heart or a happy face, and before you know it you’ll be impressing your friends with long stitches, French knots, and lazy daisies.
Check out our review of five great cross stitch patterns to try out [more…]